Sunday 31 October 2010

marshmallow cornflake balls.

At last, it's Halloween! Have you picked out your costume yet? .___.; Because I haven't... since the family isn't too big on this holiday nor is my neighborhood. It's much to dangerous to go out at night for fear of getting shot or mugged. Though that doesn't mean you can't enjoy a small gathering with friends or family in the safety of home~

Initially a lovely friend and I were planning a Halloween party~ but let's just say we're working on an autumn gathering instead. Haha~ anyway, I found a container of chocolate sprinkles in the pantry and decided to put it to use (rather than spooning them straight into my mouth).

I ended up making corn flake balls with them in light of Halloween~ though there's nothing spooky about these at all. They're just tasty and semi-addictive.

They're are quite versatile~ you can add in toasted and shelled pumpkin seeds into them or anything you'd like really. I wouldn't suggest adding eye of newts or wolf's bane into the mix. =)

Wrap these babies up in decorated foil or cellophane to give away as treats or as fillers for goodie bags.
 marshmallow cornflake balls.

we'll need:

4tbls butter (1/2 stick)
1 bag mini marshmallows (flavored and plain both works)
3~4 cups cornflakes
1 cup of your choice of nuts, seeds, chocolate pieces, candies... etc. (I'm using spiced maple pecans and chocolate sprinkles)

utensils:
nonstick pot
spatula
greased nonstick baking sheet
decorated foil or cellophane wrap

~In the pot, melt the butter and marshmallows over medium heat, stirring occasionally with the spatula. Remove from heat and gently stir in the cornflakes and your choice of seeds...etc. When everything is coated, pour the mixture onto the baking sheet. Let it cool for 5 minutes. With greased hands, grab a handful of the cornflake mixture and carefully shape into balls. Then wrap in the foil or cellophane.


Have a safe and happy Halloween!

Thursday 28 October 2010

maple spiced pecans.

Whilst taking the train downtown today~ I was entranced by the alluring scent of spiced cider throughout my rather dull journey.


It brought about so many memories of fall that I hold dear. Of pumpkin pies fresh out of the oven, mulled wine, scarves and knit gloves,the crunching of leaves upon pavement, that sharp bite of cold in the air... and the star of tonight's post: maple spiced pecans!

There are wonderful as holiday gifts or as something to snack on as you sit by the fireplace, indulging in your favorite novel or perhaps staring out at the rain speckled window panes.


maple spiced pecans

we'll need:

1lb (4 cups) untoasted pecans
3tbls unsalted butted (melted)
4tbls maple syrup
1tbls light brown sugar
1tsp salt
1/4tsp ground nutmeg
1/4tsp ground cinnamon
1/4tsp allspice

Utensils:
measuring spoons/cups
mixing bowl
spatula
baking sheet lined with parchment paper

>>preheat oven to 375F<<

~Place all ingredients into the mixing bowl and toss well. Spread the nut mixture in a single layer onto the baking sheet and bake for 12~15minutes until browned, stirring frequently.Remove from oven and allow to cool for about 10minutes. Serve!

Monday 25 October 2010

cheese crisps.

Well, this was quite an eventful weekend! Our awesome Gaints are off to the World Series, watched two lovely friends get piercings ( I was rather squeamish the whole time, it was just so hard to watch!), and I dyed my hair red~ (>.>;;) I might be able to pull off a certain Grell (from 黒執事 kuroshitsuji) for our campus Halloween party, though my hair isn't nearly as long as his (or as red).

But after all this, there's one thing I've learned: it's truly the simple things in life that's the most fulfilling. You can splurge on a pair of cute shoes or outfit, but that happiness is only temporary. Eventually, you'll grow tired of them. A day chilling with friends and catching up, on the other hand, lasts so much longer, even though the day has long passed, you're still able to smile back on the memory. And to continue with the theme of simplistic pleasures...

Cheese crisps! They look ever so elegant and taste equally as such~ but it's terribly simple to make!

Three simple ingredients: your favorite hard cheese (or a mix), rice flour, and yourself! That's all there is to it~ you can also add a teaspoon of dried herbs or a dash of paprika for an extra kick. 


These are great for snacking on with a good brew or wine. Though, my favorite way to serve these crisps are on top of a simple salad lightly tossed with vinaigrette, adding a layer of texture and complexity.


cheese crisps

we'll need:
1 cup hard cheese of your choice (grated)
1 tbls rice flour (or all-purpose)
1tsp dried herb of your choosing (optional)

utensils:
measuring spoons/cups
mixing bowl
nonstick frying pan
spatula
cooling rack

~Heat the pan over medium heat. Meanwhile, mix together the cheese, flour and dried herbs (if using) in the bowl. Then, by tablespoonfuls, place the cheese mixture on the pan, making sure to spread it so there are no concentrated spots of cheese, we're aiming for an elegant lacy look here. When the cheese starts to bubble and the edges are lightly golden (about 1min), gently flip the crisp over and let it remain for 30seconds. Remove and place on a cooling rack. (If you want to shape them, gingerly place them over a rolling pin or the underside of a small bowl) Continue until you use up the rest of the cheese mixture~ then they're ready to serve!


※An alternate way to prepare these crisps is to spread the cheese mixture by tablespoonfuls on a baking sheet, baking at 350 for about 5~10minutes.

Friday 22 October 2010

deliciously simple drop doughnuts

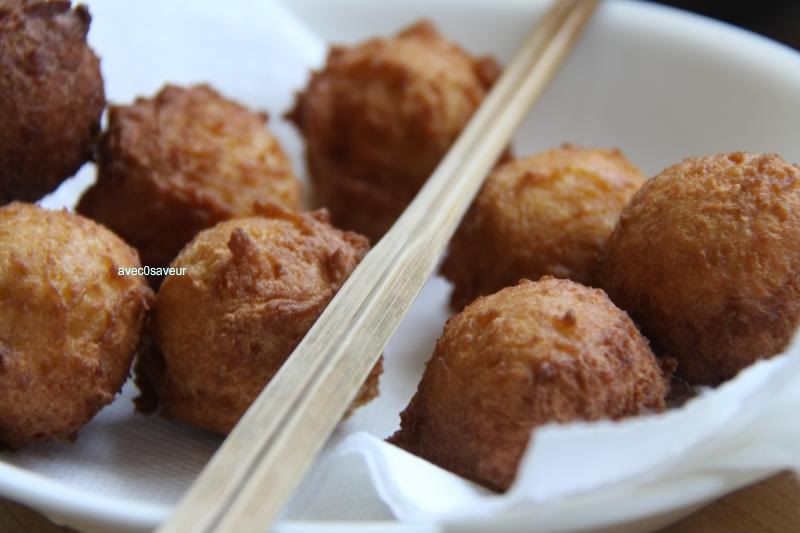
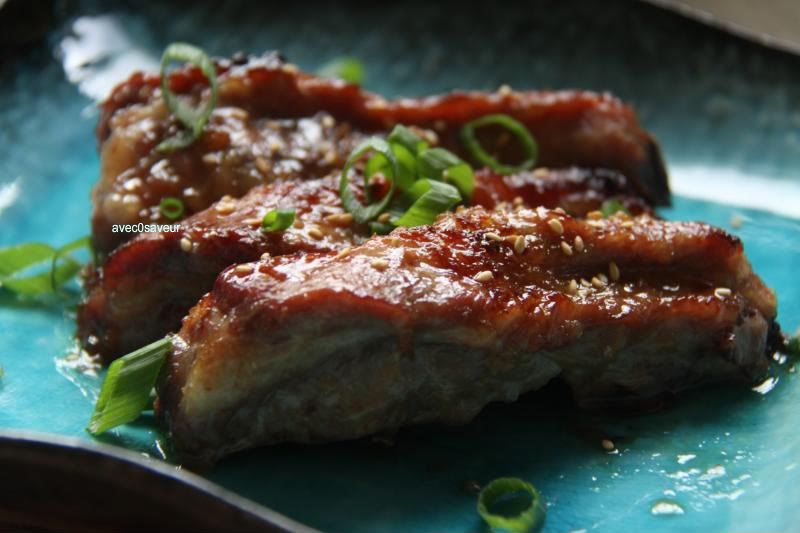
I've been craving doughnuts lately... actually I've been craving a lot of comfort foods, haha. These few months have been taking their toll~ I still find it hard to believe that these things are happening to me, but it's life.  I  must accept however many curve-balls it decides to throw. The silver lining?


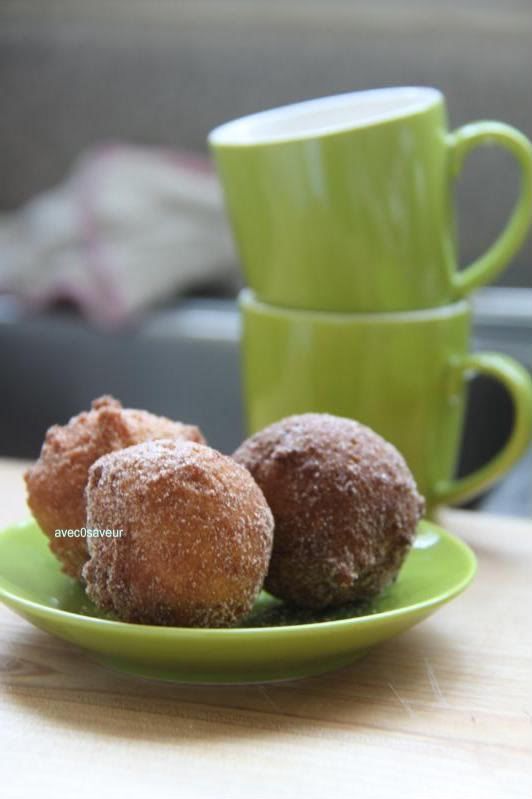
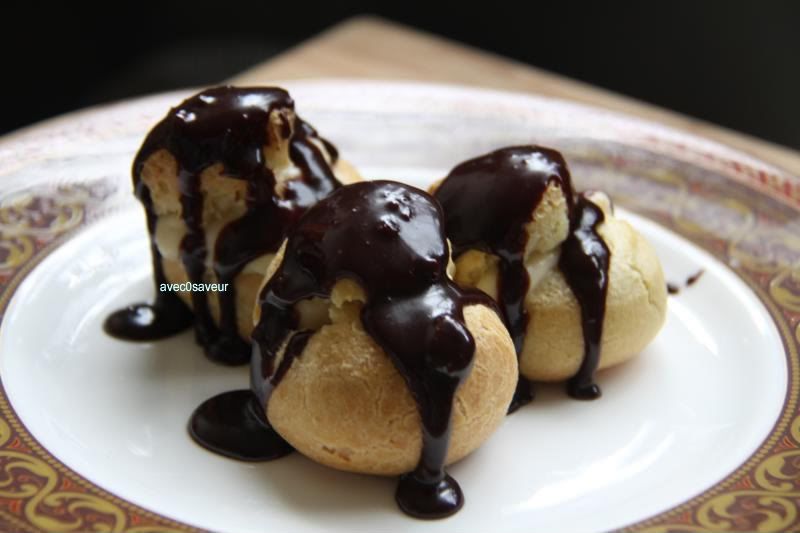
These babies right here! Aren't they just the cutest things~? ;)


 So cute~ I could just eat them all up!


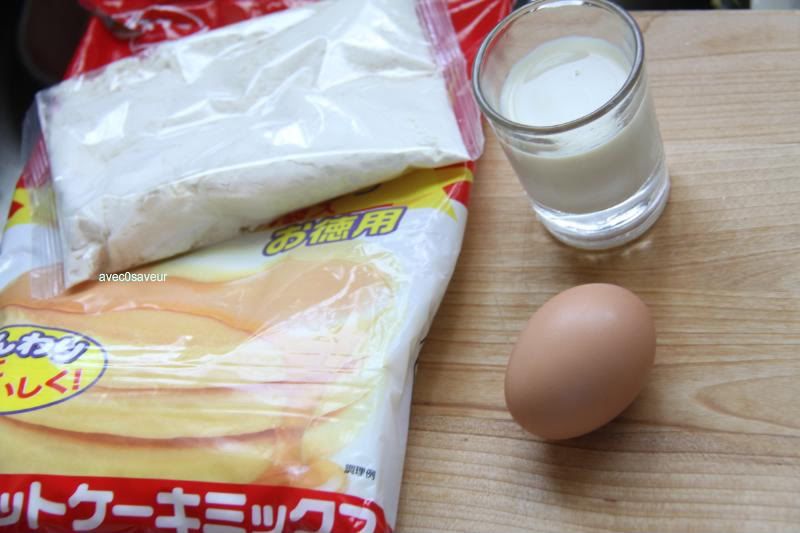
Soft, sweet, and oh so indulgent, but best of all, they're a cinch to make! All you need is an egg, milk, and a package of pancake mix (Ssh!! That'll be our dirty little secret).


You can coat them in a mixture of cinnamon and sugar or powdered sugar~ whatever floats your boat! ^_^

drop doughnuts.
(translated and adapted from the recipe given on the 「スキー」 hot cake mix)


we'll need:

-for the doughnuts-
1 pkg hot cake mix (200g or 1 1/3 cup)
1 egg
1 cup milk/soy milk/ or water
4 tbls melted butter
3 tbls maple syrup (optional)

-for the coating-
1~2 tsp ground cinnamon + 1/2 cup sugar
or
1/2 cup powdered sugar

3 cups vegetable/corn/peanut...etc oil for frying

utensils:
mixing bowl
wooden spoon
measuring cups/spoons
heavy pot
candy thermometer
spider/tongs/ or chop sticks
cooling rack or plates lined with paper towels
1 or 2 paper lunch bags

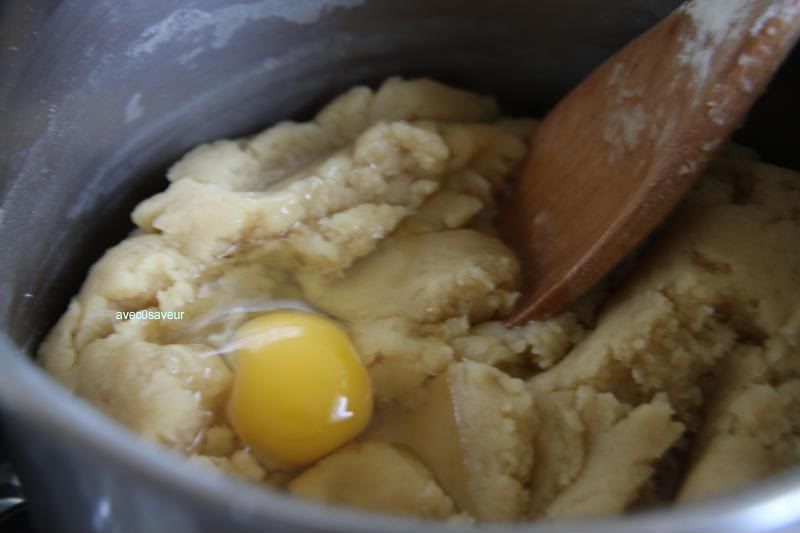
~Heat the oil in the pot until it registers at 360F on the thermometer. Meanwhile, with the wooden spoon, combine all the ingredients for the doughnuts in the mixing bowl. (If the dough is a bit stiff, add 2~3tbls more of the selected liquid) Once the oil has come to temperature, spoon a moderately sized chunk of dough (no more than 3tbls, otherwise the center won't cook through) and plop it into the oil. Fry until golden (about 1~2mins on each side) and drain on the cooling rack or towels.


~While the doughnuts are still hot, place a few of them into the lunch bags, add your choice of coating, roll up the tip of the bag and shake until coated. Then pour onto a plate and serve!


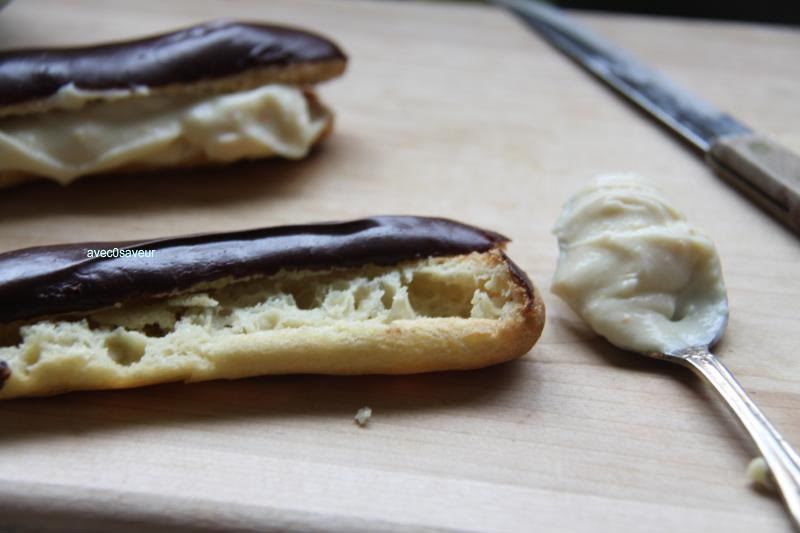
For an added bit of indulgence, make a slit with a knife and add a bit of jam, peanut butter, Nutella... etc into the center.

★PSST! I've made a Twitter account~ so feel free to follow me, Avec_Saveur, for minute by minute (sorta) updates and just me rambling about life or... public transportation.

Monday 18 October 2010

choux pastry.

Sorry for the delay in my posts! Life decided to star me in the role of some unnecessary drama. So that knocked me off track for a while. My apologies! But I'm here now. >_>;; And so allow me to introduce to you all to my lovely friend...

choux pastry! Which bakes up to be an assortment of tasty treats! It's a truly versatile pastry dough.


You can pipe them into an assortment of shapes and sizes~ bake 'em~


fill them up with your favorite filling~


dip them into a chocolate glaze (recipe included) for some elegant eclairs!


or drizzle a bit of the same glaze over for some sinfully delicious profiteroles!

They may look intimidating to make, but it's fairly simple! Impress friends and loved ones by whipping up a batch of these for tea time or dessert. ^_^

choux pastry.
 (adapted from The Food of France: a journey for food lovers)

we'll need:

1 stick + 1 1/2tbls unsalted butter
1 1/2 cup milk (or water)
2 tbls sugar
1/4 tsp salt
1 3/4 cup all-purpose flour
7 eggs

chocolate glaze*
1 recipe pastry cream filling

utensils:

measuring cups/spoons
2 saucepans (preferably non-stick)
wooden spoon
piping bag or a large freezer bag
parchment paper

>>preheat oven to 375F<<

~Melt the butter with the milk (or water), sugar, and salt in one of the saucepans, then bring to a rolling boil. Remove from heat and add the flour. Return the mixture back to the heat and beat continuously with the wooden spoon to make a smooth shiny paste that comes away from the side of the pan. Let cool for 3mintues.


~Beat in the eggs one at a time, until the mixture is smooth and shiny (the mixture should drop off the spoon, but not be too runny). Place the piping bag or freezer bag into a tall glass to prop it up and fill with the mixture.** Line a baking sheet with parchment paper and pipe the choux pastry into desired shapes. (or you can spoon dollops of the pastry dough onto the parchment instead) Bake for 25~30minutes until they are puffed and carry a light golden complexion. After removing from oven, prick each of the pastry with a toothpick to allow steam to escape.

*To prepare the chocolate glaze melt together 4oz of your favorite baking chocolate and 2tbls unsalted butter in a saucepan over low heat.
**The choux pastry can be stored in the piping/freezer bag for up to 2 days in the refrigerator.


For profiteroles: split the puffs in half and spoon the pastry cream filling in between. Drizzle or spoon over with chocolate glaze if desired.

For eclairs:  Dip half the pastry in the chocolate glaze and allow to harden (15~20mins). Then split them in half lengthwise and fill with pastry cream


Enjoy!

Sunday 10 October 2010

orange rosemary pastry cream.

I've been craving for eclairs and profiteroles for a while now~ So I've decided to satisfy that craving! Though before I can even go on to make them, I need to work on a filling. My palate was tried of the traditional vanilla or chocolate pastry cream. So...

Behold~ orange rosemary pastry cream. I know, I know... it's a weird combination. But trust me on this~ it'll work out in the end. It's sort of like love and relationships, sometimes you need giant leaps of irrational faith to pull through. Though, for me... It's taking all of my sanity and patience along with faith to deal with my predicament. Guys are so troublesome and just frustrating sometimes. And... we still bother with them. The only difference is that the thing that's getting broken are eggs and not hearts. A much less painful ordeal~

Orange, meet rosemary. I'll leave you two to mingle and get to know each other. ;)

orange rosemary pastry cream


(adapted from the Tartine cookbook)

we'll need:

2 cups whole milk
1 sprig rosemary
zest of 1 large orange
1/4 tsp salt
1/2tsp vanilla extract
3~4tbls cornstarch
1/2 cup + 1tbls sugar
2 large eggs
4tbls unsalted butter

utensils:
measuring spoons/cups
heavy saucepan
whisk
2 heat-proof bowls
fine-mesh sieve
plastic wrap

~Rest the sieve on the rim of one of the bowls and set aside. Pour the milk into the saucepan, adding the sprig of rosemary, orange zest, and salt. Place the saucepan over medium-high heat, and bring to just under a boil, stirring occasionally and making sure that the milk solids are not sticking to the bottom of the pan.

~Meanwhile, in the second mixing bowl, whisk together the cornstarch and sugar. (For a firmer pastry cream, add the 4th tablespoon of cornstarch) Add the eggs and whisk until smooth. When the milk is ready, remove the rosemary sprig, add the vanilla and remove from heat. Carefully ladle about one-third of the hot milk into the egg mixture, whisking continuously. Pour the mixture back into the hot milk and continue whisking over medium heat until the custard is as thick as lightly whipped cream (about 2mins). Let the mixture reach the boiling point to cook the starch. (Do not allow the pastry cream to boil vigorously as it will turn into a curdled mess.)


~Remove from the heat and immediately pour the mixture through the sieve, into the bowl. Let cool for 10 minutes, stirring occasionally to release the heat and prevent a skin from forming on top. Next, cut the butter into 1tbls pieces. When the pastry cream is about 140F, whisk the butter into the pastry cream 1tbls at a time, always whisking until smooth before adding the next tablespoon. Cover with plastic wrap, pressing it directly on top of the cream to prevent the formation of skin. Place in the fridge and let it firm up.


Use this cream as fillings for tarts, accompaniment to fruits, or as fillings for profiteroles/eclairs.

Note: To prepare plain pastry cream, simply omit the orange zest and rosemary, adding 1tsp of vanilla extract instead of 1/2.

Recipe for choux pastry is here~

Wednesday 6 October 2010

sake plum infused green tea.

Today was an exceptionally beautiful day. The sun decided to pay The City a visit again. It was warm, but the breeze carried that faint bite of the autumn chill.


 Since sunny days are a rarity, I decided to spend the day after lectures outside in the garden beneath the shade of a paper umbrella bequeath to me by my late step-grandfather. He was a charming, sweet man who loved me as if I was one of his own. I'll forever be grateful for that. I'd like to think that my grandmother's finally reunited with him up there in that ethereal paradise. She fought so bravely... but I'm going quite off tangent!

I decided to break out my favorite pair of wooden sandals to wear. They always seem to cheer me up when I slip my feet upon its smooth, cold lacquered body.


Of course, one doesn't lounge under the sun without proper refreshments! I brought along a few "wagashi"(和菓子)or Japanese sweets for snacking on. With wagashi, there must be a pot of steaming green tea to stand up to the intense sweetness of the red bean paste that often fills them.


And this is what I'll be introducing to you all, my lovely readers and fellow culinary deviants! Green tea infused to sake plums. The family goes through a lot of plum sake and often time we tend to accumulate a lot of plums which we keep in a jar tucked behind the milk in the fridge. So, I decided to see if it works with green tea and surprisingly it pairs quite well as the tea doesn't carry a strong flavor, allowing the aroma of the plum and sake to come through.


sake plum infused green tea

we'll need:
2~3 sake plums (crushed slightly, with the side of a kitchen knife)
2 green tea bags

an assortment of wagashi (Japanese sweets) to serve 

utensils:
tea pot
tea kettle

~Fill a tea kettle with water and bring to a boil. Next, carefully pour the hot water into the tea pot until it's half way full. Let stand for about 10minutes and pour out the water. Place the plums and tea bags into the pot and fill completely with hot water. Let steep for 15minutes.

Find a shady spot and enjoy with wagashi!


Saturday 2 October 2010

honey garlic ribs.

It's finally Sunday and alas, it's nearly Monday~ the two extremes. Though for the meantime, it's still Sunday, so let's try to savor the last few hours before we've to slip into slumber and march to our lectures or office the next morning. Life goes on, whether our sleep-deprived selves are ready or not. Unfortunately.


I'm still trying to pull myself together, but it's rather difficult since matters of the heart and amour are sadly being aweaved to my woes. But, anyway, I've been craving comfort foods as of late. Something flavorful and soothing to the soul... and what better than honey garlic ribs!

Simple ingredients with equally simple preparation. It's totally worth a try!

honey garlic ribs

we'll need:

4~6 pork ribs (washed and dried)

1tbls grated ginger
1 clove of garlic (minced)
1tbls sake (Japanese rice wine)
3tsp soy sauce
2tsp sesame oil
1/4 cup honey

toasted sesame seeds and chopped scallions for garnish
steamed rice to serve

utensils:
measuring spoons/cups
mixing bowl
fork
plastic wrap
baking dish (large enough to fit the ribs)

>>preheat oven to 375F<<

~In the mixing bowl, mix together the grated ginger, minced garlic, sake, soy sauce, sesame oil, and honey with the fork. Next, add in the prepped ribs and toss until evenly covered with the marinade. Cover with plastic wrap and place in the fridge for at least 1/2hr.


~Drain off the the marinade from the ribs into the bin and line them up in the baking dish. Bake for 30~35mins. Then, turn the broiler on to high and broil for 3~5 mins, until the ribs color and a hint of char appears on the edges. Carefully remove from the oven and let rest on the counter for 3 mins. Plate and garnish with the toasted sesame seeds and chopped scallions.